
Quick Overview
VidPly is a universal, accessible media player supporting multiple sources:
| Media Type | Source | Privacy Layer | Best For |
|---|---|---|---|
| Video | Upload MP4/WebM + HLS/DASH | No | Local & streaming video |
| Audio | Upload MP3/OGG + HLS/DASH | No | Podcasts, music, streaming |
| YouTube | Video URL | Yes (GDPR) | External videos |
| Vimeo | Video URL | Yes (GDPR) | Professional videos |
| SoundCloud | Track/Set URL | Yes (GDPR) | Music, podcasts |
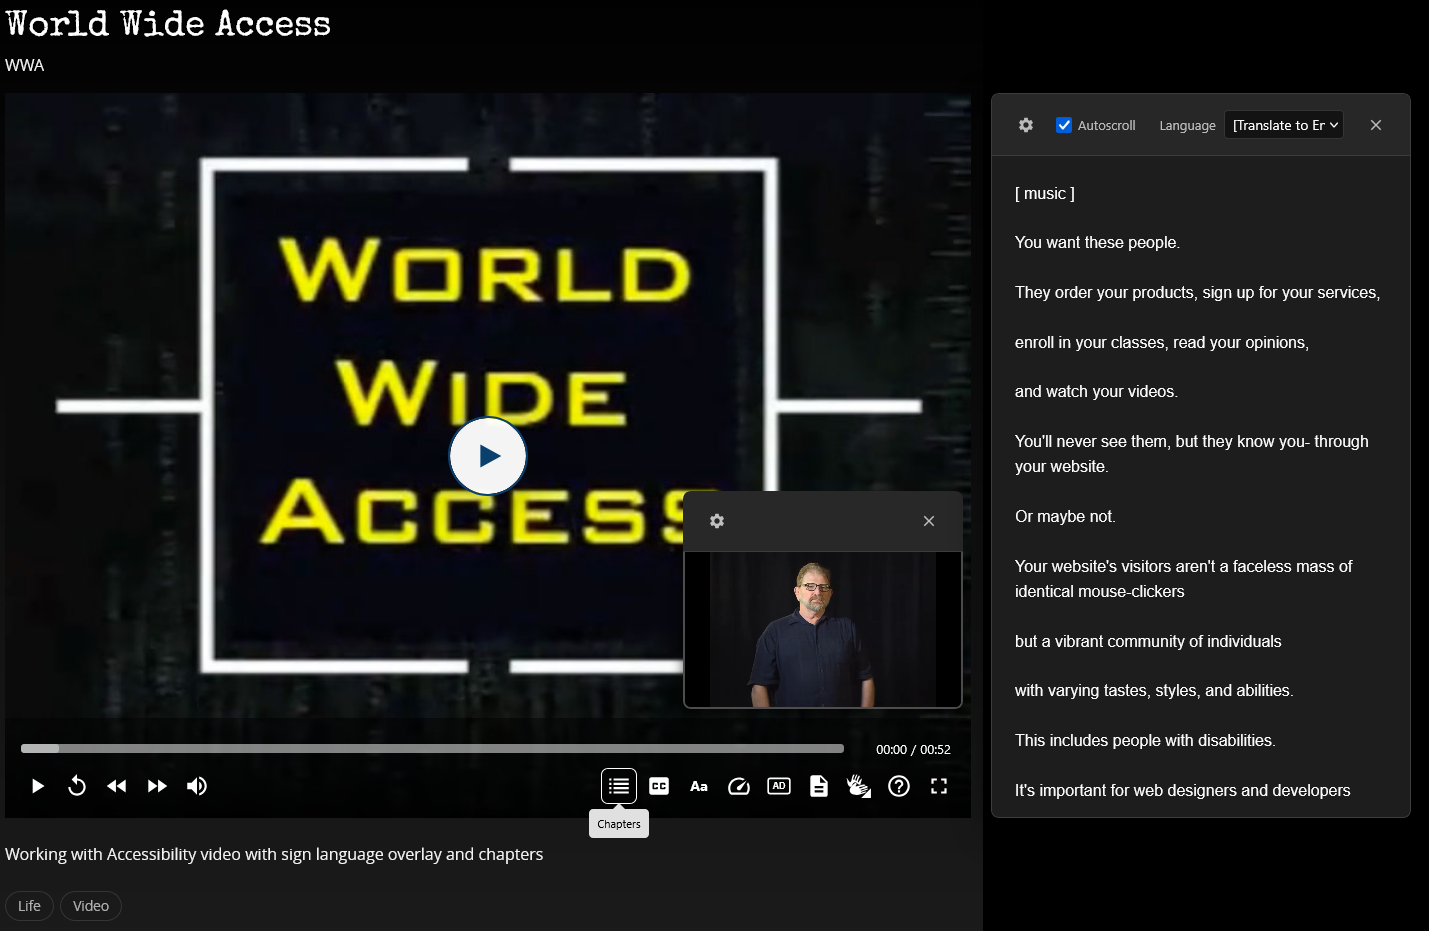
Step 1: Create Media Records
First, create reusable media items in the VidPly Media storage.
Step 2: Add Player to Page
Then, add a VidPly Player content element and select your media.
Step 1: Creating Media Records
Where to Find It
Web → List Module → Select storage folder → Click "+" → VidPly Media
Or use the "Create new record" button in the VidPly Player element.
Fastest way: Import from URL
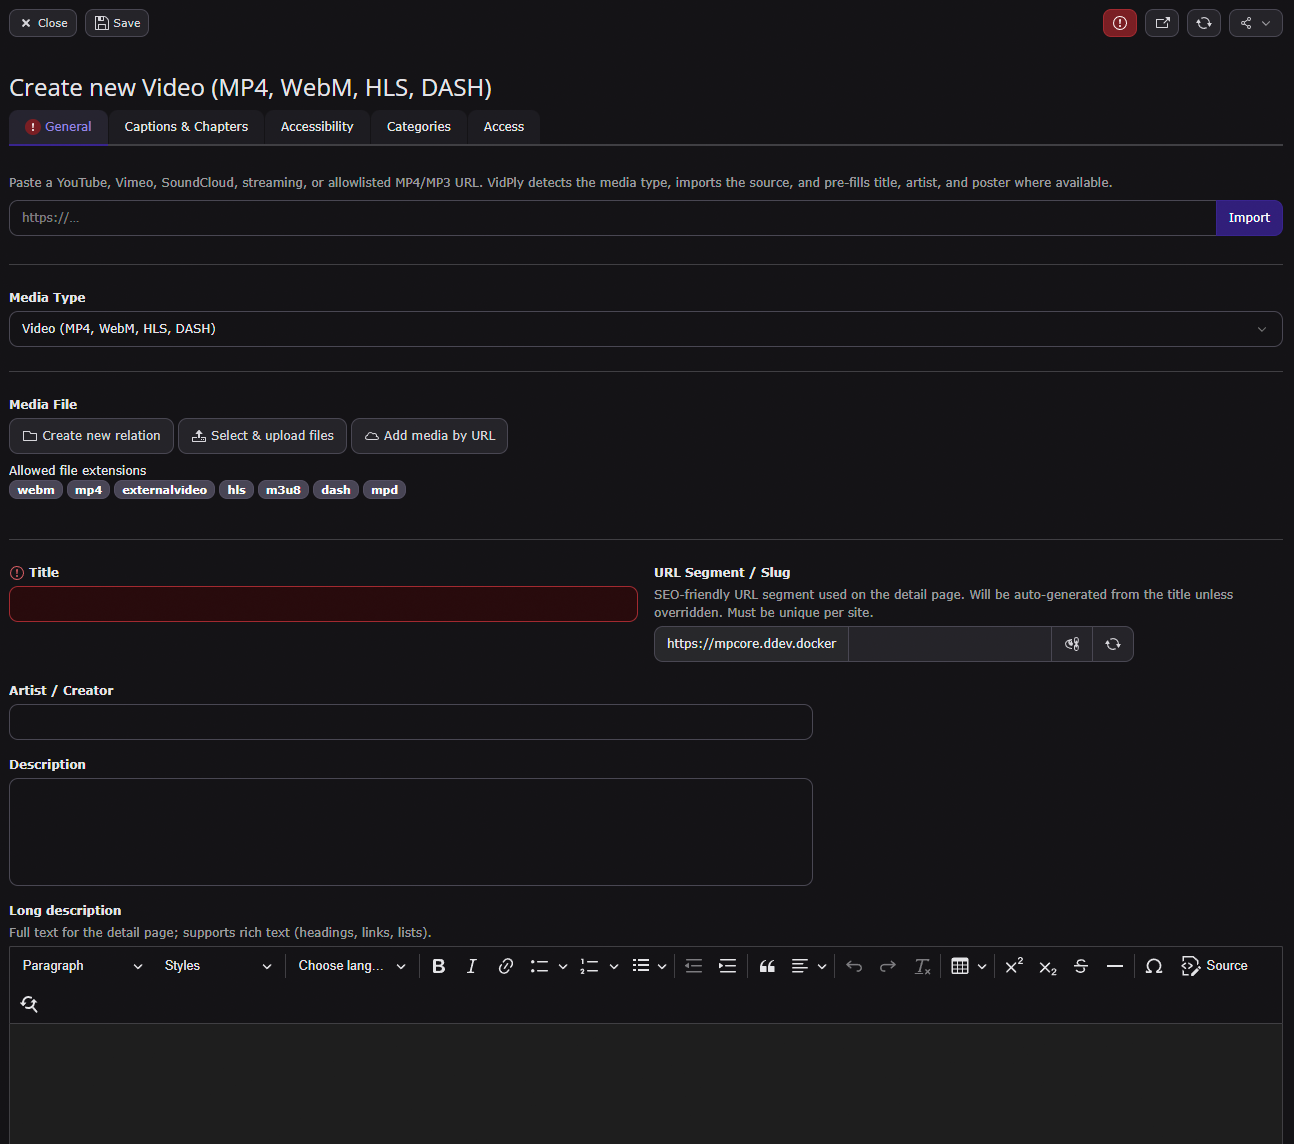
For YouTube, Vimeo, SoundCloud, streaming URLs (.m3u8 / .mpd), and allowlisted external MP4/MP3 links:
- Create a new VidPly Media record (or open an existing one)
- At the top of the form, use Import from URL
- Paste the full media URL and click Import
- VidPly detects the media type, attaches the online-media file, and pre-fills title, artist, and poster when the provider returns them
- Review the fields, add captions if needed, then Save
You no longer need to pick the media type before pasting the URL. The manual Media type dropdown and Add media by URL on the file field still work for power users.
On existing records with a linked online-media file, use Refresh metadata to re-fetch oEmbed data without overwriting fields you already filled in manually.
Media Types Explained
Video
Use for: Self-hosted video files, HLS/DASH streaming with optional progressive fallbacks
Supported formats: MP4, WebM, HLS (.m3u8), DASH (.mpd)
How to create:
- Select media type: Video
- Click "Add media file" and upload your video or add a streaming URL (.m3u8 / .mpd)
- Optionally add additional files as fallbacks (e.g. DASH + HLS + MP4)
- Add a title (required)
- Add a poster image (thumbnail shown before playback) — allowed formats: JPG / JPEG, PNG, WebP, SVG
Tips:
- Upload multiple formats for browser compatibility and fallback (DASH → HLS → MP4/WebM)
- Recommended: MP4 with H.264 codec as progressive fallback
- HLS/DASH sources use embedded captions by default; local VTT files can override them
- HLS streams play through
hls.json Chrome / Firefox / Edge / desktop Safari and through native HLS on iOS / iPadOS — captions, transcript and quality controls work on all platforms - Keep file sizes reasonable (compress for web)
Audio
Use for: Podcasts, music, audio content, audio streaming
Supported formats: MP3, OGG, HLS (.m3u8), DASH (.mpd)
How to create:
- Select media type: Audio
- Click "Add media file" and upload your audio or add a streaming URL (.m3u8 / .mpd)
- Optionally add additional files as fallbacks (e.g. DASH + HLS + MP3)
- Add a title (required)
- Optionally add a poster image (album art) — allowed formats: JPG / JPEG, PNG, WebP, SVG
YouTube
Use for: YouTube videos with GDPR-compliant privacy layer
How to create:
- Select media type: YouTube
- Click "Add media file" → "Add external video"
- Paste the YouTube URL (e.g.,
www.youtube.com/watch.) - Add a title (required)
- Add a poster image (shown before consent) — allowed formats: JPG / JPEG, PNG, WebP, SVG
- Optional: add your own captions, chapters and the transcript on the Captions tab, as for MP4 videos (see Captions & Subtitles). YouTube's own captions are never shown.
Privacy behavior:
- Video does NOT load until user clicks play
- Shows privacy notice overlay
- No tracking before user consent
- Compliant with GDPR requirements
Playback: After consent the video plays inside the VidPly player — with the same accessible control bar, keyboard shortcuts, captions and transcript as an MP4 video — also when the content element contains only this one video. Whether this applies is decided per site by the site setting Controls for YouTube and Vimeo (mpcVidply.embedChrome, see SettingsArchitecture): vidply (default) or provider, which embeds YouTube's own player instead.
Vimeo
Use for: Vimeo videos with privacy layer
How to create:
- Select media type: Vimeo
- Click "Add media file" → "Add external video"
- Paste the Vimeo URL (e.g.,
vimeo.com/123456789) - Add a title (required)
- Add a poster image — allowed formats: JPG / JPEG, PNG, WebP, SVG
- Optional: add your own captions, chapters and the transcript on the Captions tab, as for MP4 videos (see Captions & Subtitles)
Privacy and playback: Same as YouTube — nothing loads before consent; afterwards the video plays inside the VidPly player unless the site setting Controls for YouTube and Vimeo is set to provider.
SoundCloud
Use for: SoundCloud tracks or playlists with privacy layer
How to create:
- Select media type: SoundCloud
- Enter the Media URL (track or set URL)
- Add a title (required)
- Add a poster image (optional) — allowed formats: JPG / JPEG, PNG, WebP, SVG
After the user accepts the privacy notice, playback runs inside the SoundCloud Widget iframe (visual waveform UI). This is the default, lightweight path. Developers can optionally switch to VidPly's unified control bar via a template/processor override — see PrivacyLayer → Switch SoundCloud to Renderer Mode.
Adding Metadata
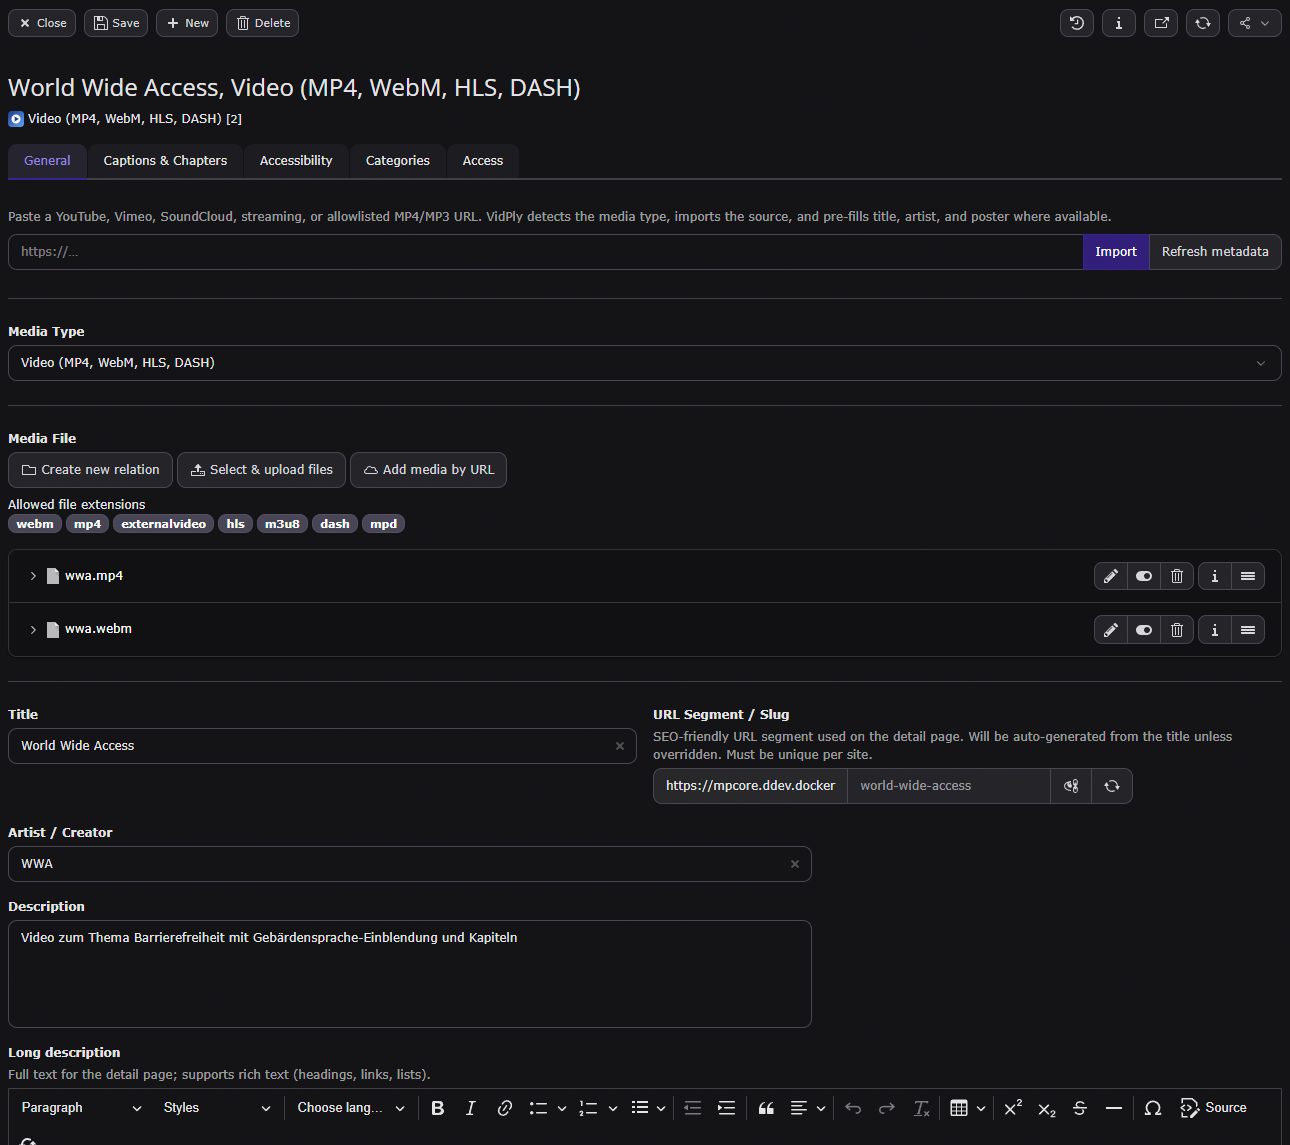
Every media record has a metadata palette:
| Field | Description | Required |
|---|---|---|
| Title | Display name in player/playlist | Yes |
| Artist | Creator name (shown in playlist) | No |
| Description | Short text (list cards, player context) | No |
| Long description | Rich text (CKEditor); shown on the VidPly Detail page below the short description, behind a Show description button in the Episode card layouts, and in a popover on listview grid cards | No |
| Slug | URL segment for listview detail links (auto-generated from title; override on Metadata tab) | No |
| Duration | Length in seconds (for display) | No |
| Publish date | Release date of the episode; shown in the episode card and playlist, and used as publication date in the structured data | No |
| Episode number | Free text above the title in the episode card (e.g. 11, S2E4) | No |
| Poster | Thumbnail image | Recommended |
| Categories | TYPO3 categories (shown as chips on listview cards; used for automatic listview row selection) | No |
VidPly Listview & detail page (overview)
To build an Mediathek-style overview: add a VidPly Listview content element, pick a detail page, and add one or more Listview rows (shelf or grid, manual or category-based selection). Optional: turn on client-side pagination and set items per page per row, use the in-browser Sort control on the public site, and keep shelf definitions on the default language when the site is translated. See `Listview` for step-by-step setup, URLs, and administrator notes.
VidPly Detail (the content element on the media detail page) has a Related content option under Settings (on by default). Turn it off if you do not want the “You might also like” row below the player.
Player UI Options (per media record)
Which options a record shows depends on its media type:
| Media type | Options shown |
|---|---|
| Video | All four options below |
| Audio | All except Enable floating player |
| YouTube, Vimeo | Only Hide keyboard shortcuts help — embeds have no speed control in the VidPly bar and nothing that can be downloaded |
| SoundCloud | None — SoundCloud keeps its own widget without the VidPly control bar |
- Hide speed button: Hides the playback speed control for this media item.
- Single item: the speed control is hidden.
- Playlist: the speed control is hidden only while this item is the active track (it can re-appear for other tracks).
- Hide keyboard shortcuts help: Hides the help button (
.vidply-help) in the control bar for this media item. Same single-item / per-track playlist behavior as the speed button. The?keyboard shortcut still opens the shortcuts dialog when keyboard controls are enabled on the content element. - Allow download: Offers the media file for download. Works automatically when a progressive file (MP4, WebM, MP3, OGG) is attached. For HLS/DASH-only records, add a progressive fallback file so a downloadable URL can be resolved (manifests themselves are not downloadable).
- Single item: a download button appears in the control bar.
- Several media: the control bar button follows the selected track — it offers the file of whatever is playing and disappears on tracks without the setting.
- Episode list layout: every episode is listed, so the download becomes a link on the episode itself and can be used without selecting the track first.
- Enable floating player (custom PiP): Replaces the browser's native Picture-in-Picture with VidPly's draggable, resizable floating window (also triggers when the video scrolls out of view while playing). Only applies to single-item players, not playlists. Distinct from the standard PiP toolbar button, which uses the browser's native mini-player.
- Buffering spinner: A centered loading spinner is shown automatically while the player is buffering — no configuration required. Works for local files, HLS and DASH streams.
Accessibility Features
VidPly provides WCAG 2.2 AA accessibility support.
Captions & Subtitles
Tab: Captions
Add WebVTT (.vtt) or SubRip (.srt) files for viewers who need captions (including many deaf and hard-of-hearing users):
- Click "Add captions file"
- Upload your
.vttor.srtfile - Set Track kind: Captions or Subtitles
- Set Language name: e.g., "English", "Deutsch"
- Set Language code: e.g., "en", "de"
- Save the media record — SRT files are converted automatically to WebVTT; you will see a backend notification when conversion succeeds
Multiple languages: Add multiple caption files for each language.
YouTube and Vimeo: The Captions tab is available for YouTube and Vimeo records too. Your files are shown by the VidPly player, so they only appear while the site setting Controls for YouTube and Vimeo (mpcVidply.embedChrome) is vidply (default); with provider the provider's own player is used and VidPly captions and transcript are not shown. SoundCloud always uses its own widget and has no Captions tab.
SRT uploads: SubRip (.srt) is accepted for convenience. VidPly stores WebVTT internally because browsers and the transcript feature require it. The original SRT file is replaced on save.
Legacy SRT files already in the file storage: Ask a site administrator to run the one-time upgrade wizard Admin Tools → Upgrade → Upgrade Wizards → VidPly: Convert SRT caption files to WebVTT (no command line required).
VTT Example:
WEBVTT

00:00:00.000 --> 00:00:03.000
Welcome to our video tutorial.

00:00:03.000 --> 00:00:07.000
Today we'll learn about VidPly.
Chapters
Tab: Captions → Chapters
Add chapter markers for easy navigation:
- Click "Add chapters file"
- Upload your chapters
.vttor.srtfile (SRT is converted to WebVTT when you save the media record) - Set Track kind: Chapters
- Set language info
Chapters VTT Example:
WEBVTT

00:00:00.000 --> 00:02:30.000
Introduction

00:02:30.000 --> 00:08:00.000
Main Content

00:08:00.000 --> 00:10:00.000
Conclusion
Audio Description
Tab: Accessibility → Audio Description
VidPly supports two spoken audio-description workflows plus text descriptions in the transcript.
Option A — Described video (recommended)
For blind and low-vision users, add a video with narrated descriptions already mixed into the audio:
- Click Add audio description
- Upload an alternative MP4 or WebM with embedded narration
- Users toggle between standard and described video via the AD button
Optionally set Audio Description Duration when the described version is longer than the original.
Option B — VTT speech (extended AD, no described video)
When you do not have a described video file:
- Under Captions, upload a WebVTT file and set track kind to Descriptions
- Leave Audio Description empty (or set mode explicitly — see below)
- With Audio Description Mode set to Automatic or Descriptions VTT speech, VidPly pauses the video at each description cue, speaks the text via the browser’s speech synthesis, then resumes playback
Text description cues remain visible in the transcript panel for users who prefer reading. This path requires browser speechSynthesis support; voice quality varies by browser.
Audio Description Mode
Tab: Accessibility → Audio Description Mode
| Mode | Behavior |
|---|---|
| Automatic (default) | Use described video if uploaded; otherwise VTT speech if a Descriptions VTT exists |
| Described video only | Swap to described MP4/WebM only; ignore VTT speech |
| Descriptions VTT speech | Speak descriptions VTT cues only; do not swap video |
Alternate caption/chapter files for described video
When using described video swap, you can attach an Audio Description Version VTT per caption or chapter file reference (tx_desc_src_file). Those alternate files load when AD mode is active.
Sign Language
Tab: Accessibility → Sign Language
Add sign language interpretation overlay:
- Click "Add sign language video"
- Upload video with sign language interpreter
- Appears as picture-in-picture overlay
Transcripts
Tab: Captions → Enable Transcript
Generate searchable text transcript from captions:
- Enable "Show transcript panel"
- Captions are displayed as clickable, searchable text
- Users can click any line to jump to that point
Select Media Items
Media Tab:
- Click in the "Media Items" field
- Search for and select your media records
- Add multiple items for a playlist (2+ items)
Configure Player Options
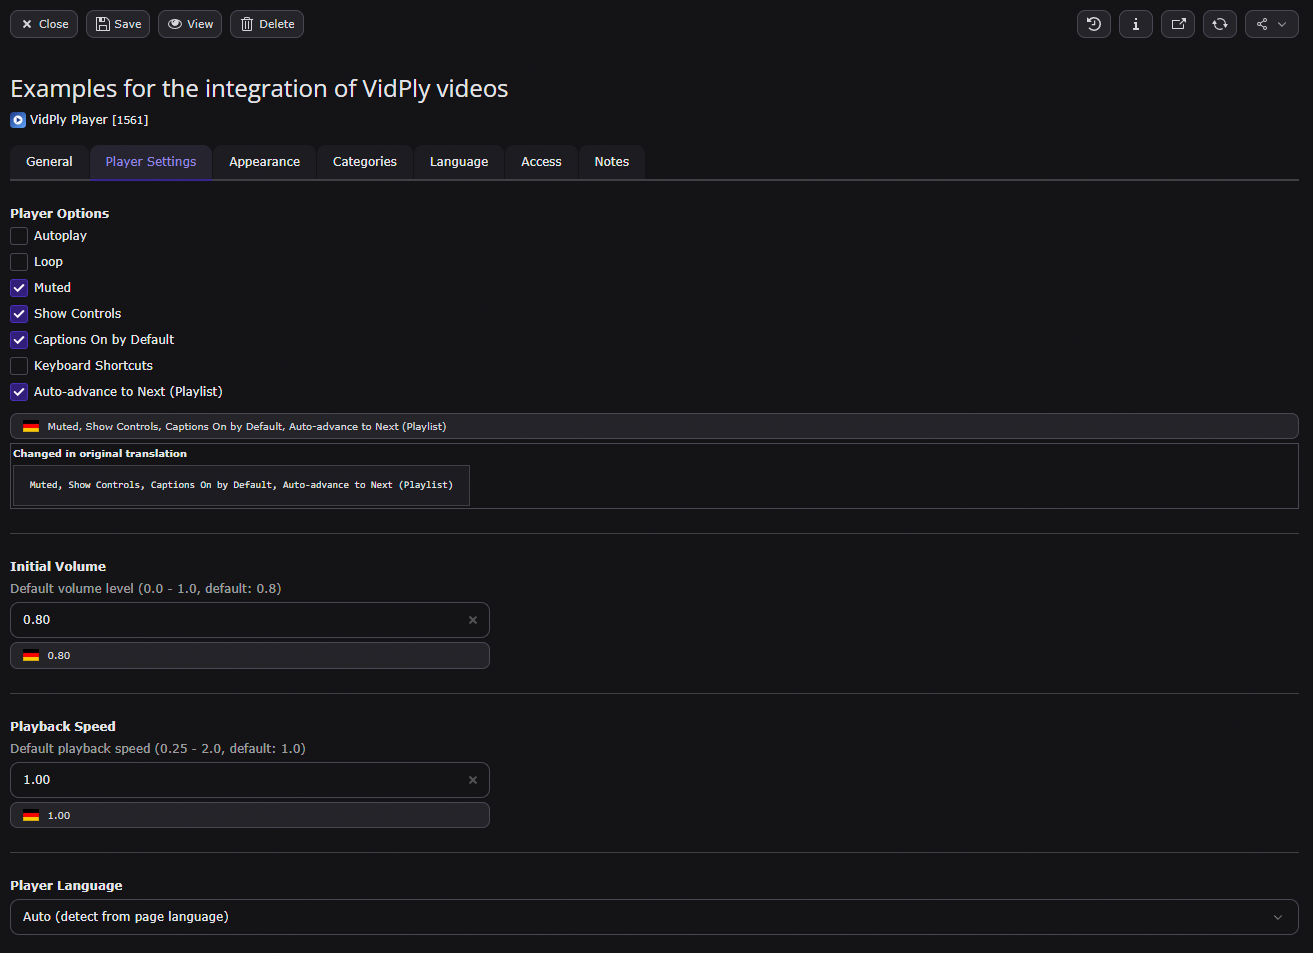
Settings Tab:
| Option | Default | Description |
|---|---|---|
| Layout | Player only | Presentation of the element — see below |
| Playlist position | Below the player | Where the in-player playlist panel appears when two or more media items are selected (below or right on desktop; mobile always stacks below) |
| Resume from last position | Off | Offer to continue where the visitor stopped (overrides the site default when set on this element) |
| Autoplay | Off | Start playing automatically |
| Loop | Off | Loop when finished |
| Muted | Off | Start muted |
| Controls | On | Show player controls |
| Captions Default | Off | Show captions by default |
| Keyboard | On | Enable keyboard shortcuts |
| Auto Advance | On | Auto-play next in playlist |
Playback Settings:
- Volume: Default volume (0.0 - 1.0)
- Playback Speed: Default speed (0.25 - 2.0)
- Language: Force specific UI language
Transcript (per media item):
- Enable transcript per media record: Media record → Captions tab → “Enable Transcript”
- The transcript panel is shown if at least one selected item has transcript enabled.
Episode card layout (podcasts)
The Layout field controls how the element is presented:
| Layout | Result |
|---|---|
| Player only | The plain player — unchanged default |
| Episode card | Square cover with a large play button, episode number, title, publish date, duration and description; the player sits below |
| Episode card with episode list | Card header follows the now-playing track, plus a server-rendered episode list below the player (the in-player playlist panel is hidden — the list is the track picker) |
The card is filled from the first selected media record. Publish date and episode number come from that record's metadata palette, and the cover is its poster — so give podcast episodes a square poster for the best result. The card reflows to a single column when the content column is narrow, so it works in sidebars and modals as well.
Episode list order and pages
With Episode card with episode list, three more fields appear in the Settings tab:
| Option | Default | Description |
|---|---|---|
| Episode order | Manual | Order the list opens in: manual (the order of your media items), date newest/oldest first, or title A–Z |
| Paginate episode list | On | Split the list into pages once it holds more episodes than fit on one page |
| Episodes per page | 10 | How many episodes one page shows (1–200) |
Visitors can re-sort the list themselves with the dropdown next to the Episodes (n) heading. Sorting and paging only change the list: playback always follows the order of your media items, so next/previous and auto-advance stay predictable — and when playback moves to an episode on another page, the list jumps to that page.
Episodes without a publish date are listed last in both date orders, so fill in the publish date if you rely on sorting by it.
Show notes in the card and the list
Whenever a media record has a Long description, its card and its list row get a Show description button that folds the rich text open in place. Nothing has to be switched on for it — fill the field and the button appears; leave it empty and the card looks as before. Visitors who want everything at once still have the detail page, which prints the same text expanded.
Keep the long description well structured (paragraphs, lists, links). It is rendered as it is, right below the episode, so very long texts push the next episode far down even though they start out collapsed.
The same text is reachable from the listview as well: cards in a grid row get a small button in their bottom-right corner that opens the description in an overlay. Cards in a shelf row do not — a shelf scrolls sideways and has no room for it, so there the card's link to the detail page stays the way in.
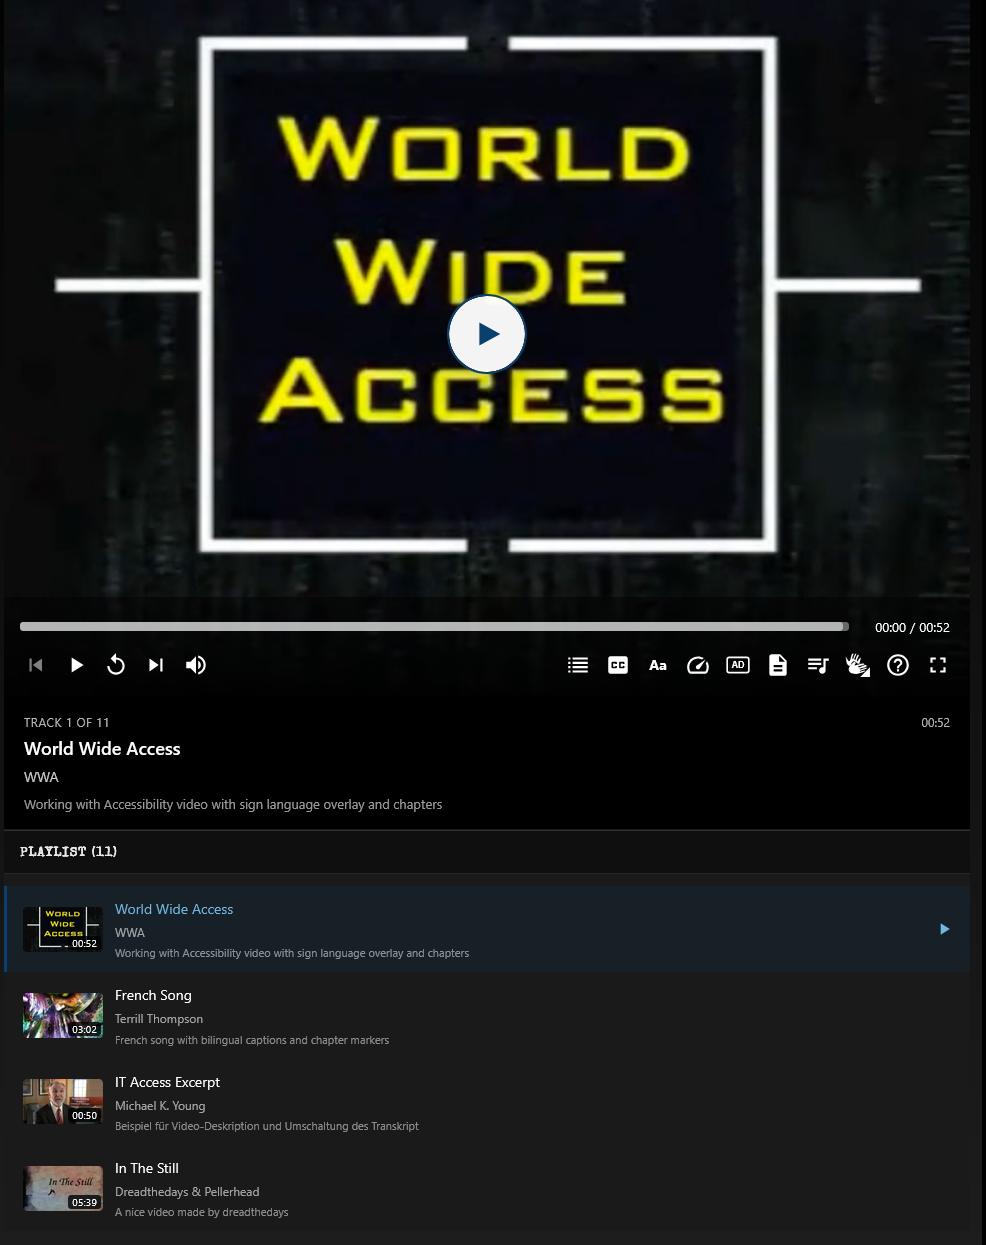
Select 2 or more media items to automatically create a playlist:
- Thumbnail list appears alongside or below the player (see Playlist position)
- Click any item to play it
- Auto-advance plays next track
- Loop option cycles through all tracks
Playlist position (Settings tab, visible with 2+ media items):
| Value | Result |
|---|---|
| Below the player | Default — scrollable track list under the control bar |
| Right of the player | Desktop layout: player and controls in the left column, playlist in the right column (from 75rem viewport width). On narrower viewports the list stacks below the player |
The playlist toggle sits in the right control bar (next to captions, settings, and fullscreen). On very narrow widths it may move into the overflow menu while previous, play/pause, next, and volume stay visible.
Live streams
HLS and DASH live sources (for example TV streams ending in .m3u8) are detected automatically. The player then:
- Shows a LIVE badge instead of total duration
- Hides restart and playback-speed controls
- Shows Go live and skip-forward only when the viewer falls behind the live edge
- Keeps captions and the interactive transcript in sync as new subtitle fragments arrive
Import .m3u8 URLs into a Video media record (not Audio) when the stream carries video — VidPly respects the record's media type even when the URL matches both audio and video allow-lists.
Best Practices
- Use consistent poster images (same dimensions)
- Add titles to all items
- Consider grouping related content
- Order items logically (drag to reorder)
Player Controls
Visual Controls
| Control | Function |
|---|---|
| Play/Pause | Start or pause playback |
| Volume | Adjust volume + mute |
| Progress bar | Seek to position |
| Skip previous/next | Previous/next in playlist |
| CC | Toggle captions |
| Settings | Quality, speed, captions |
| PiP | Browser Picture-in-Picture (native mini-player) |
| Fullscreen | Enter fullscreen |
Note: Enable floating player on a media record uses VidPly's custom in-page floating window instead of (and in addition to configuring) native PiP behaviour. See Player UI Options above.
Keyboard Shortcuts
| Key | Action |
|---|---|
| Space or K | Play/Pause |
| M | Mute/Unmute |
| F | Fullscreen |
| C | Toggle captions |
| ← | Seek back 10s |
| → | Seek forward 10s |
| ↑ | Volume up 10% |
| ↓ | Volume down 10% |
| Home | Go to start |
| End | Go to end |
| ? | Open keyboard shortcuts help (dialog) |
Keyboard shortcuts help
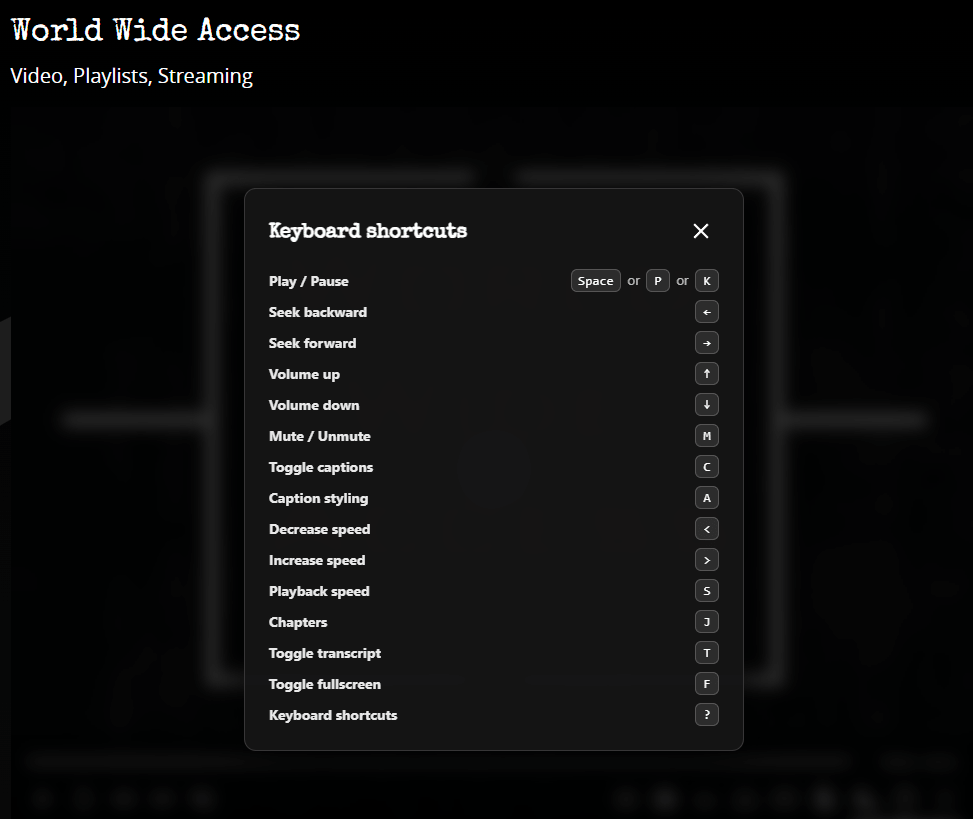
When Keyboard is enabled on the content element, users can press ? or click the help button in the control bar to open a focus-trapped dialog listing all active shortcuts. Hide the button per media record with Hide keyboard shortcuts help (the ? shortcut still works unless keyboard controls are disabled on the content element).
Privacy Layer (GDPR)
For YouTube, Vimeo, and SoundCloud:
How It Works
- Before consent: Only poster image + play button shown
- Privacy notice: Explains data will be sent to external service
- User clicks play: Video loads and plays immediately
- No cookies until user explicitly consents
Configure Privacy Layer Settings
List Module → Privacy Layer Settings
Customize the privacy layer content for all external services:
- Create a new Privacy Layer Settings record
- Configure settings for each service (YouTube, Vimeo, SoundCloud):
- Headline (optional) - Display above privacy text
- Intro Text - Text before privacy policy link
- Outro Text - Text after privacy policy link
- Policy Link - URL to privacy policy page
- Link Text - Text for the privacy policy link
- Button Label (optional) - Accessible label for play button
- For multilingual sites: Create translated versions of the record
Settings apply to both single items and playlists. Empty fields automatically use default translations.
What Users See
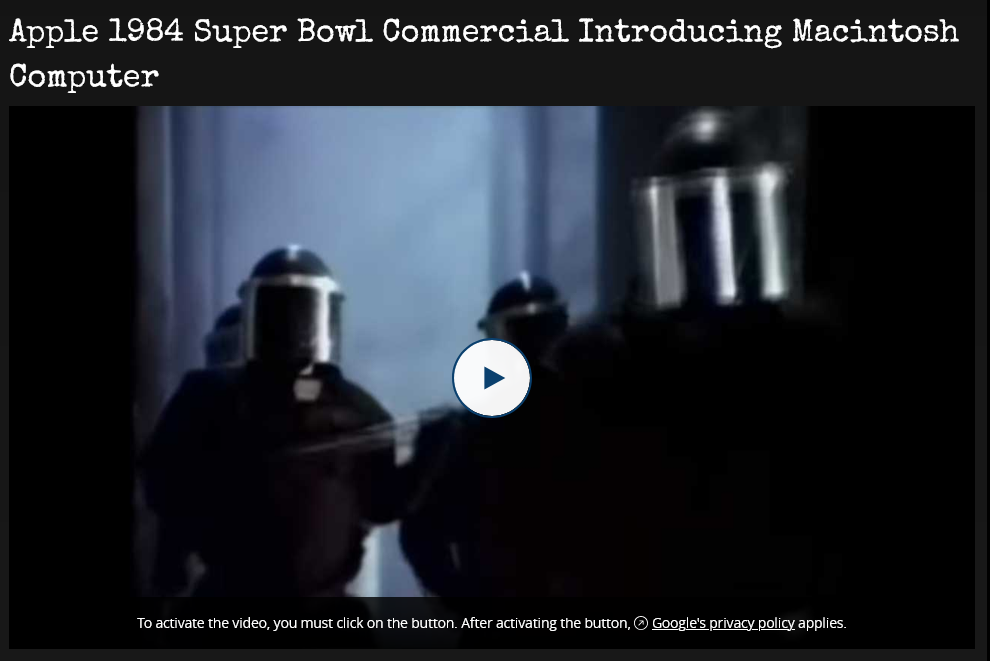
┌─────────────────────────────────┐
│                                 │
│      [Poster Image]             │
│                                 │
│         Play                    │
│                                 │
│  [Optional Headline]            │
│  Privacy Notice: Clicking play  │
│  will load content from YouTube │
│  and send data to Google.       │
│  [Privacy Policy Link] applies. │
└─────────────────────────────────┘
Tips & Best Practices
Video Quality
- Resolution: 1080p or 720p for web
- Bitrate: 5-8 Mbps for HD
- Codec: H.264 for MP4
- Always provide a poster image
Audio Quality
- Bitrate: 128-320 kbps MP3
- Sample rate: 44.1 or 48 kHz
Accessibility
- Always add captions for videos with speech
- Provide audio descriptions for visual content
- Use meaningful titles
- Add alt text to poster images
Performance
- Compress videos before upload
- Use appropriate resolution (not always 4K)
- Consider adding HLS or DASH streaming sources for long content
- External services (YouTube/Vimeo) reduce server load
Mobile
- Test on mobile devices
- The player is responsive by default and adapts to screen/container size
- Touch controls work automatically
Troubleshooting
| Problem | Solution |
|---|---|
| Video not showing | Check media record is not hidden |
| Playlist not working | Need 2+ items; check browser console |
| Captions not loading | Validate VTT syntax; check CORS headers |
| YouTube not loading | Check URL format; clear caches |
| Privacy layer stuck | Clear TYPO3 caches; check JS loading |
| Privacy settings not showing | Verify Privacy Layer Settings record exists and is not hidden |
| No sound | Check muted option; volume setting |
VTT Validation
Ensure your VTT files:
- Start with
WEBVTTon first line - Have blank line after
WEBVTT - Use format:
HH:MM:SS.mmm --> HH:MM:SS.mmm - Have text on next line(s)
Quick Reference
| Task | Steps |
|---|---|
| Add video | List → New VidPly Media → Video → Upload / add streaming URL |
| Add audio | List → New VidPly Media → Audio → Upload / add streaming URL |
| Add YouTube | List → New VidPly Media → YouTube → Paste URL |
| Add captions | Edit media → Captions tab → Add VTT or SRT (SRT auto-converts on save) |
| Create playlist | VidPly Player → Select 2+ items |
| Configure privacy layer | List → Privacy Layer Settings → Create record |
| Enable privacy | Automatic for YouTube/Vimeo/SoundCloud |
Need help? Contact your site administrator or see the documentation index.